4/28-5/2
- Kimberly Dao
- May 1, 2025
- 3 min read

This week I went back on the Word clock code and reviewed the code. I tackled the problem with the DLS code and I realized with Mr. Christy that we did not need the code at all because the pcf8523 actually takes in the computer's time and date. The computers automatically change for EDT and EST so the purpose of creating a code to change itself was useless. However, I kept the DLS code in the code if anyone is struggling making a DLS code.
After fixing that quick and silly issue, I decided to work on making a webserver with esp32. I first read an article about how to connect to the WIFI and its strength. I used this link, it has the example code for Arduino: https://randomnerdtutorials.com/esp32-useful-wi-fi-functions-arduino/. Most of the guides I followed are from the RandomNerdTutorials, they are very helpful. The second tutorial I read was how to install LittleFS Uploader. This will allow me to upload information to the esp32. I was able to upload data that the esp32 printed into the serial monitor.
LittleFS uploader example code.
#include "LittleFS.h"

void setup() {
  Serial.begin(115200);
  delay(2000);

  if(!LittleFS.begin()){
    Serial.println("An Error has occurred while mounting LittleFS");
    return;
  }

  File file = LittleFS.open("/test_example.txt", "r");
  if(!file){
    Serial.println("Failed to open file for reading");
    return;
  }

  Serial.println("File Content:");
  while(file.available()){
    Serial.write(file.read());
  }
  file.close();
}

void loop() {

}
The tutorial was easy to follow except, when it came to installing and dragging certain downloads into specific folders that I couldn't fine. I had to click a box to view hidden folders which revealed the Arduino IDE to me. It was time consuming as I wanted to understand the example code instead of simply pasting it into file and the upload time was very slow. This is the photo of the message I had in the data folder, this is the link to the website: https://randomnerdtutorials.com/arduino-ide-2-install-esp32-littlefs/.

After I finished with the uploader, I worked on actually creating a webserver. I used the example code to test if it would work first. It took a longer than I thought because of moving folders and files around. The example code is a simple as it turns a LED on and off through the webserver. I want to use this code as a way to make my own webserver and how the webserver will change the colors of the word clock. I made two notepads that contained the css and html code. The html code creates the heading and the GPIO state and on & off button.


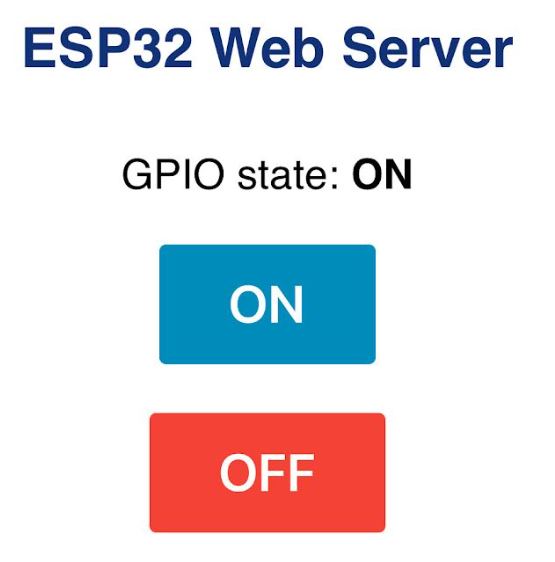

The offstate is just the previous state the LED was on. Currently it is on while it was last off.
My next goal of the webserver is to try and break down the code to where I will be able to make my own webserver. I want to figure out how to make it change the color into different pairs. I want to make special event colors for the word clock. Connecting to the webserver is a little tricky as the IP can only be used if the device is connected to the WIFI it's connected to. Mr. Chirsty suggested I play around with the design of the webserver to understand it more. I decided to change the colors and the font of the webserver through to html (name change) and css (font + colors).


Comments